Pages

August 24, 2012

Panko Crusted Salmon Fillet with pesto mayo


I made Panko Crusted Salmon last night. It was super tasty! I can't recall what I was watching, some show on the Food Network. The epi was about a sandwich lathered with a pesto mayo. I keep buying French Bread to make the sandwich, however we would end up eating the bread with other things before we ever made the sandwich. Or I would forget to buy the pesto when I bought the bread...yes, I forget to bring a list. Even when I bring a list I don't look at it all the time. I actually remembered to buy the pesto this time, but ate the bread alone....so I decided to make the pesto mayo and would use it on salmon.

Bread Crumbs: I highly recommend panko bread crumbs. I love the light crispy texture more then regular bread crumbs.


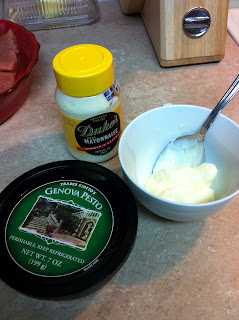
Pesto: I prefer to buy the premade because it's cost effective. I enjoy whatelse but Trader Joes prepared pesto. You can make your own pesto if you do desire!.


Mayo: Please don't use miracle whip! Unless u think it's the best stuff on earth! I prefer my Best Foods (or known as Helmans on the East Coast). I actaully really like Dukes which I found at the Dollar store....it's a popular brand I found when living in Florida, I really like it.

Seafood: Great money saving tip. Walmart has a great frozen food section that carries  Salmon, Tilapia, Shrimp & Scallops. The small bags run $5 (unless you live in Alaska or Hawaii you will pay more.) for four fillets. You can have 4 small servings or two large servings. Fish is individually frozen so it's great! But use whatever salmon you like!


You could even adapt this recipe and instead of salmon try shrimp, or a white fish.

Smoked Paprika: Love this stuff!! If you don't have the smoked version, no need to add the non smoked plain paprika. Smoked gives a nice flavor, non smoked is more of a coloring effect then for flavor.

2 tBs mayo
2 tSp pesto
4 Salmon Fillets
1 cup of panko bread crumbs
2 tBs grated parmesan cheese
Dash of salt to your tasting
Pepper
1/4 tSp Smoked Paprika
2 or 3 tBs Canola Oil for frying

Lemon Sauce (scroll to bottom)
3 lemons
2 tBs butter

In a bowl combine mayo & pesto, mix well. Lightly season fish with a little smoked paprika, salt & pepper. Then rub pesto mayo onto fish. I got my Little Cupcake involved in this process. I gave her a food brush and let her lather it up. I don't suggest allowing a young child to do this with their hands, only becasue the fish is raw and they might try to eat whats off their hand. Just watch the little ones.

In a separate plate combine panko bread crumbs, parmesan cheese, smoked paprika, dash of pepper & salt


Heat your pan on high until smokey then turn to a medium temperature then add the oil and let heat up until it starts crackling.

Place fish into bread crumbs and coat both sides of fish. Then place into hot oil pan.


Let fish cook for 3 min, check bottom to make sure there is gold brown color. Once ready, flip and cook for another 3 min on the other side. Then place fish on a cooling rack with paper towels underneath to catch any oil. Finish the rest of fish. You may keep fish warm in a warm oven if you have a few fillets to finish. Depending on pan size you should be able to cook 2 fillets at a time.


Also note if your Salmon is on the thicker side you may need to continue to cook for an additional 2 min. If your fish gets brown before the fish is cooked in the middle and you are worried it may burn. Either turn down temperature of  burner to a medium low OR place fish on a cooling rack then place cookie sheet underneath (this will allow air to circulate and not get bottom mushy). Place fish in a preheated oven on 350 for 15 min to allow fish to finish cooking. I personally prefer my fish medium rare, fish is a little opaque in the middle. So cook longer if it's not to your liking.

Serve with your favorite vegetable or salad and with rice for a complete meal. My Little Cupcake likes this version because of the crispy coating.

There are two types, breaded and nonbreaded 


Lemon Sauce
I like a lemon butter finishing sauce. I did not make with this meal because I thought I had lemons but I was wrong.

Still using the same pan you cooked your fish in, dump oil out and any left behind bread crumbs. Place burner on a medium low temperature. Simply squeeze juice from 2 or 3 lemons (you want about 1/3 cup). Place 2 tBs of butter in pan and let melt, then add lemon and let simmer for 2 minutes. Taste to see if you want more butter flavor. If so add 1 tBs of butter to sauce. Let cook for 1 min. You can drizzle onto your fish, or place on the side.


Note: I did make two versions of salmon using the pesto mayo. One was breaded the other was left unbreaded. For unbreaded version follow all the steps, but do not coat fish in bread crumbs and only add 1tBs of oil to pan. 

Non-Breaded Fish


August 23, 2012

Oatmeal Crusted brulee French Toast w/ Sour Cream Strawberry Syrup


I always wanted to make french toast with french bread...you may ask "really, you haven't?" I have only used french bread once to make french toast over the past 20 years. So when I saw my french bread on the counter this morning, I said "ooooooooo I'm making french toast, finally!!!" I was going to use the french bread for a yummy sandwich, which I still will because I have half of a loaf left.

Honestly there is not "real" recipe here.  With this type of cooking I find I don't need exact measurements. So you can adjust to your tasting.

Warning: If you have a little one, they may want to eat your ingredients...not a bad thing! I gave my Little Cupcake the job of mixing the cinnamon with the oats. Lets say she was obsessed with eating the oats LOL So I was not going to get more, my suggestion...maybe put extra in the plate in-case your little one eats them up. Actually the past hour she has been eating them and once she is finished she asks for more.

Bread: I used french bread. However I have always used sandwich bread for this. How tasty would raisin cinnamon bread be? Yummy! So you can use what you have on hand, or make it extra special and buy french bread.

Cream: Milk or cream? I'll let you decide. I prefer to use half and half because I stock a lot in my fridge for my coffee. But please feel free to use what you have. I will say the reason I  prefer cream is because of the thicker coating. I find milk is more runny and causes my french toast to be soggy faster.

Oatmeal: Whole oats or quick oats? I decided to go with the quick oats however if you have whole oats only, please don't  run out to buy quick oats for this recipe. Of course I think its a good idea to stock your pantry with both, just in-case!

Sour Cream & Strawberry Jam syrup: There is no wrong way to make this. Just use whatever jam/jelly you have, I have strawberry. Mix portions to your taste buds. I got this idea when I was thinking of how My Mr.Tasteful and his sisters would go to Ihop and order the tutti frutti pancake breakfast. They would get the strawberry compote and instead of whip cream, ask for sour cream. I thought it was strange! But no, it was good! In fact my mother in-law would make a yummy desert mixing fresh berries and tossing with sour cream and honey or sugar. So why not make a syrup?

Brulee: Ive tried this a couple times, my best tip is do not mix brown sugar with the oats. It will just burn!!! You will need to do this in stages that I will explain below. You don't have to do this step. I will warn you you need to work fast!

1/2 loaf of french bread, equal 6 slices
2 eggs
4 tSp of half & half
1/2 tSp of vanilla extract
dash of cinnamon
1/2 cup of quick oats
dash of salt
1 tBs brown sugar
3 tBs sour cream
2 tSp strawberry jelly

  •  Slice your french bread into 6 slices (use your serrated knife for this)
  • In a shallow bowl combine egg, cream, vanilla, dash of salt and a dash of cinnamon (to your liking) 
  • In a separate plate, place oats and another dash of cinnamon and combine
  • In a separate bowl combine sour cream and jelly and mix together then place in the fridge. 
  •  using a non stick pan or your cast iron skillet (any pan works, just butter it well) turn temp to high, then turn down to a medium temp.
  • drench 2 or 3 slices of bread into egg mixture, coating both sides.
  • then dip bread into oats and coat both sides
  • take a nice slice of butter into skillet let melt
  • place bread into pan and let simmer for 2 min
  • flip bread to other side. Then spread a thin layer of butter on top, and then sprinkle top with brown sugar
  • Once the other side cooked for 2 min, flip brown sugar side down. Add a thin layer of butter and brown sugar on other side. Cook for 30 seconds and then flip to other side for another 30 minuets.
  • Then place done french toast on a wire rack to let cool for 1 min. This will allow coating to get hard. If you place directly on plate it will not harden on the bottom.
  • Drizzle your sour cream & strawberry syrup over french toast. If you have strawberries add some. Serve immediately and enjoy!
mix egg, cream, vanilla, salt & cinnamon to create egg custard mixture

separate plate for oats

dip bread into egg on both sides


then dip into oats

add butter to your hot skillet

let bread cook for 2 min then flip


flip bread, add a thin layer of butter and sprinkle with brown sugar

once both sides are done, place on a cooling rack to harden


This was a challenge recipe...only becasue I was trying to take pictures. You need to work fast through the brulee portion. Well I had my hands full with my Little Cupcake. She was eating the oats, then dumping them on the floor...then well, no clean way to say this...she needed her diaper changed. Don't worry I washed my hands! So my brulee portion of the pictures reflect all the distractions I was dealing with as I was cooking. Yes, I burnt it. It still tasted good to me. It reminded me of eating a oatmeal cookie. 
My Little Cupcake eating the oats


You can skip the oat coating and the brulee portion for old fashion french toast.

still add the sour cream strawberry syrup. 


Money savings tip: Make your own olive oil?

What?? That's what I said when I saw a video post from Americas Test Kitchen. It's very complicated....okay, no it's not!! If it was I probably wouldn't do it. Click on this link for ATK video Americas Test Kitchen

Simply just combine  3 parts canola oil & 1 part extra virgin olive oil together and you have your own olive oil. You have both the taste of extra virgin olive oil with the high heat ability of canola oil. Now you don't need to buy 3 separate oils, just buy two and recycle a unused extra virgin olive oil bottle. I call that a money savings tip!

I did not have a funnel, so I made my own. On Pinterest I saw a great idea to use a plastic bottle! So I cut the plastic water bottle in half, and used the top portion as my funnel.

I had about 2/3 cups of Extra Virgin Olive Oil left in my glass bottle. So I measured out 1 & 1/4 cup of canola oil and combined to the EVOO bottle. Not hard! Now I have "olive oil"!


Make your own funnel, use a plastic bottle

Cut plastic bottle in half

you have a funnel!

Cross out the "extra virgin" on your bottle


August 22, 2012

Dont buy bags of frozen rice, freeze it yourself!

Okay, I am not against buying frozen bags of rice, it is very handy to have on hand when I am rushing and need a fast side dish. Occasionally I will buy the frozen bags from Trader Joes. I think the box of 3 bags cost about $3. One bag is about 2 cups of cooked rice and is really only 2/3 servings worth of rice.

I was doing some research and I found some info about freezing rice.  As I was following some directions I still found there were directions that could of been added, so I decided to blog about how to freeze your own rice.

As I am posting this my Little Cupcake is in the kitchen playing with the leftover frozen rice  LOL


One thing I found important is to make sure you use the right size of pot with the amount of rice you are cooking. If you put to much rice in a small pot, I persoanlly find my rice may get more mushy. So I choose a large size pot, or dont cook as much rice at one time. I grabbed my large stock pot for this once I looked at my smaller pot. I am cooking 4 cups of uncooked rice. If your pot is smaller, only cook 2 cups of rice.


Measure out 7 & 1/2 cups of cold water and place in your pot. I normally follow a 2cup of water to one cup of uncooked rice. However I typically under measure my cups and over measure my rice. Therefor that is why I am saying 7 & 1/2 cups instead of 8 cups. This just allows for a proper cooking process, at least this is what works for me. On a high heat boil your 7 & 1/2 cups of water, then once at a boil add the  uncooked rice, butter, olive oil and salt.

7 & 1/2 cups of water
4 cups of uncooked long grain white rice
2 tBs butter (I use salted)
1 tBs of salt
1 tBs of olive oil


I don't have a 6 cup measuring cup, so I just measured out using my one cup and placed in a bowl for proper accuracy. You don't have to do that, that just how I do it.  

After I add the rice I let the water continue to boil for 3 minutes then turn the heat down to low, then stir rice with a spoon, place lid on my pot and turn timer on for 25-30 minutes. After 30 min and  it appears all water has evaporated turn off heat.  Then set timer again for another 30 minutes. One important thing to remember when making rice DO NOT TAKE THE LID OFF OF POT until after the total cooking and wait time. After the 30 minutes you now may lift the lid and let any steam escape for a two minutes. Then take a fork and lightly scrap the rice and fluff. After that its up to you which step you want to go to next. If I dont have time, I  just put the lid back on and leave rice out. I left my rice out for a couple hours. Once I was ready I followed the next step.

 
letting rice boil for 3 min before lid goes on

rice has cooked for 30 min on a low heat, turn off heat and keep covered for another 30 min
rice after 1 hour.

fluff rice with a fork


Take a edged cookie sheet and line with plastic wrap (I used both foil and plastic, I prefer plastic). Then evenly layer out cooked rice onto the cookie sheet. Don't pile high, you want a thin layer. I had to use 2 cookie sheets and I only used half of my cooked rice from my pot.


Place cookie sheet's into freezer. Now I recommend you check on the rice after 30 minutes and mix the rice around, this will keep the rice from freezing into one big log. Do this twice the 1st hour. Then you can leave your rice in the freezer for another 3 hours or overnight like I did.

rice frozen and tossed twice every 30 min

 In the morning I measured out 3 cups of rice and placed in a quart size freezer bag.

place rice in freezer bag and lay flat into freezer

My 4 cups of uncooked rice equaled 17 cups of cooked rice (if I counted correctly). I had 4 freezer quart size bags with 3 cups of rice in each bag, then I had about 5 cups of cooked rice and I placed in a plastic container. That rice is for the rest of the week for side dish or to use in a casserole or make fried rice.

 I had bought a 5lb bag of rice for $3 and I still have a half of bag left...That's a great deal!

When you are ready to use frozen rice. Grab a bag dump it into a microwave safe bowl and microwave for 3 minutes. 


Dont throw away, freeze your onions.


Do you ever find a great deal on a big bag of onions and ask "how can I use them all before they go bad"? Well don't ask yourself that again! During the summer I find this to be more of an issue then during the winter. I tend to cook much less because of the warmer weather. Therefore my large bag of onions continue to sit in my cupboard wasting away. So what to do with those onions? Don't wait until they are no longer usable....freeze them!

I had a 3lb bag of onions that I bought for a $1.50 and only used maybe 3 onions. I had 4 onions leftover that had been sitting in my cupboard for a couple weeks. The older the onion, the more tears and a running nose you will get. I have heard of a trick to wear goggles to help with the tears. But as for me, I just "brave" it out.

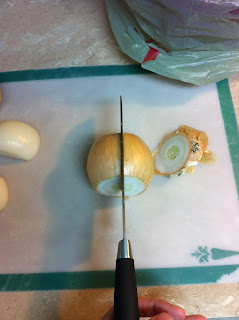
So I took a few pictures on how to cut an onion. Hey some people don't know how! There is no wrong way to cut a onion. This is just the way I like to cut a onion. 

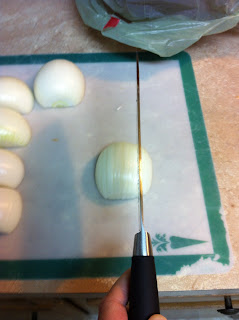
Cut the tips off at both ends, then slice down the middle...but make sure you slice the onion from the tip to bottom, not across. While I slice I like to follow the lines of the onion, it seems to serve as an anchor, sort of. Then I turn the onion and slice in the oppisit directions. You will get even cuts most of the time. Those pesky ends, well I will just lay flat and slice those again.


I choose to cut all my onions in stages. Cut off all the tips 1st, slice in half, then remove the top layer of the skin. Once I finish all my onions, then I start dicing away.

I like to have a bowl, or in my case I used a colander and placed a plastic grocery bag over it for my garbage. It keeps my prep area neat and makes for easy cleanup. Once I am finished, I just take that plastic bag, tie a knot in it and throw the bag in my garbage outside. If I would throw that bag  away in my kitchen garbage, my home would continue to smell like onions  much longer.


Once I finish dicing one onion, I like to place the onions in a bag. I recommend another plastic bag, or a Ziploc bag...not a brown bag, which is what I did this time around. The brown bag gets wet and starts to fall apart. The purpose of the bag? Well to shake the onions up. Great way to get your kiddo involved. Let them shake those onions around to separate them up. Its not a perfect method, and once you dump out of bag, you will still need to break them up a little bit. But don't go crazy!


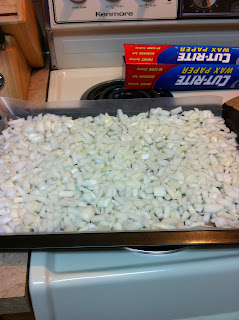
Grab a cookie sheet that has edges and layer the bottom with plastic wrap. I have used wax paper, and aluminum foil, I think plastic wrap is the best. Spread your onions evenly into the bottom of cookie sheet and place into freezer. I would recommend at least one to two hours.


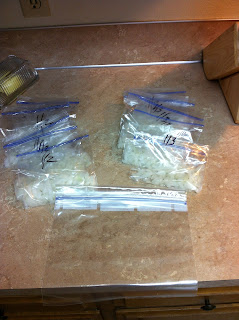
Once the onions feel frozen, you will need to move fast during this next step. Grab some sealable sandwich bags and  1 large gallon freezer bag. I choose to break up my onion into 1/3 and 1/2 cup portions. A 1/3 cup of diced onion equals half of a medium onion roughly. And a 1/2 cup portion equals one whole small onion or half of a large onion roughly. I marked each of the sandwich bags w/ the measurement using a permanent marker. I placed the sandwich bags into my freezer a couple at a time to keep onion from defrosting to much. Once I was done measuring all the onions out, I grab the bags from the freezer and I laid the bags flat and placed into the gallon size freezer bag. Then place bag into freezer and use when you need them.


 I used 4 medium to large size onions and I was able to get 6 bags of 1/3 cups of onions and 6 1/2 cups of onions.

I love to use fresh onions, however these onions are great to have on hand for anything! Plus it is a great money saving tip so you don't waste food. It also makes for a faster process prepping your food.  My one tip for cooking with frozen onions, is  if you are browning chicken in the same pan with the frozen onions, it will steam your chicken or any meat you may use. So make sure that any water that comes from the onions is dissolved before you place any meat in the pan. Or brown your meat 1st then place onions in pan.

Interestingly my Little Cupcake wanted to eat the raw onions....she thought it was a snack LOL